Reverse-engineering lens mounts for 3D printing

So you want to 3D-print a camera accessory like a lens adapter, extension tube, or a custom lens? You’ll need a lens mount design to go along with that!

We’ll clone the required dimensions from the mount found on a lens (for ‘male’ mounts) or camera (for ‘female’ mounts). One way to get an example of both the male and female mount at the same time is to buy an extension tube for your desired mount, e.g. I’ve found the ones from Meike to be good. Avoid tubes with plastic mounts as these are less accurate and may have draft angles that make them difficult to measure. Get a tube that has electronic contacts (for autofocus) so that you can use the dimensions of those as a reference as well.

You’ll need a pair of calipers for measuring the lens dimensions.

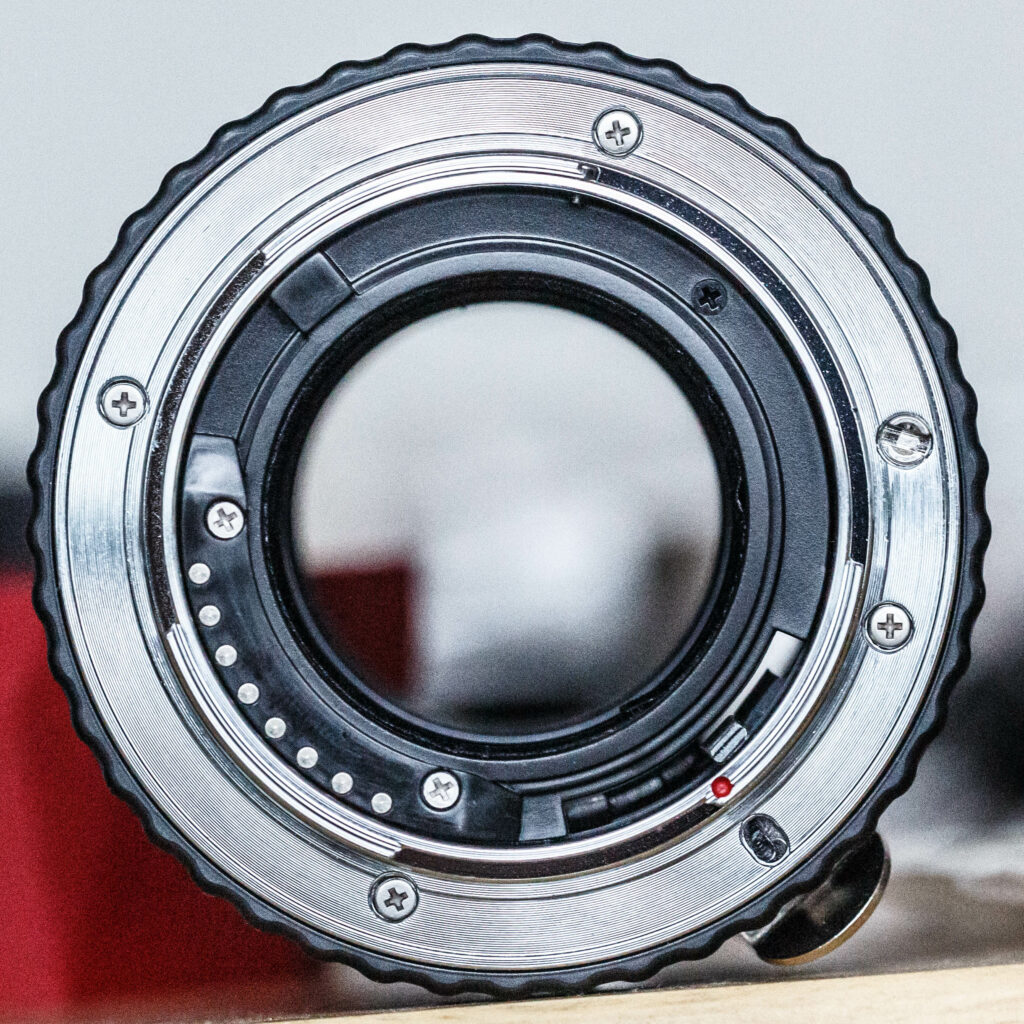
For this example I’ll show the process of modelling a Sony A lens’s ‘male’ mount using Fusion 360.

Start by taking a reference photo of your lens mount. Be sure to align your photo straight-on with the mount so that the image isn’t skewed. If you can stand far away from the mount and zoom in when you take the photo this gets you closer to an “orthographic perspective”, which means that features won’t appear to erroneously grow larger when they’re closer to your camera.

Here’s my shot:

Continue reading Reverse-engineering lens mounts for 3D printing

Driving a 4-pin computer PWM fan on the BTT Octopus using Klipper

Regular fans for 3D printers have just two wires, power and ground, and we vary the average supply voltage to the fan using PWM to change its speed.

However 4-wire computer fans like Noctuas are different, these fans expect a steady 12V power supply and a separate 5V PWM signal to set their speed. Check the pinout of your fan’s connector here:

https://noctua.at/en/what-pin-configuration-do-noctua-products-use

Continue reading Driving a 4-pin computer PWM fan on the BTT Octopus using Klipper

Recovering lost GPG public keys from your YubiKey

Have you ever generated GPG keys, loaded them into your YubiKey, and then thrown away/erased your computer? You’ll discover that when you take your YubiKey to a new computer, GPG refuses to automatically import your key when running --card-status.

The common wisdom on the Internet is that this is because YubiKeys (and Smart Cards in general) don’t store your public keys at all, they only store your private keys, so you must import your public keys from a backup or a public keyserver instead. If you don’t have such a backup, you’re screwed.

However, I investigated this and found that this common wisdom wasn’t true. I was able to recover my public keys from my YubiKey 4 even on a brand new, erased computer. Here’s how you can, too.

Continue reading Recovering lost GPG public keys from your YubiKey

Using a Canon DSLR as a webcam on macOS with Zoom

With the COVID-19 lockdown, I needed to do some videoconferencing with zoom.us, but I wanted something higher quality than my MacBook’s built-in webcam. So instead I wanted to use my Canon 5D III. (These instructions are for macOS only, not Windows)

First we need to export your camera’s proprietary liveview into a video stream we can use. To do this you can install v002-Camera-Live:

https://github.com/v002/v002-Camera-Live

Turn on your camera and connect it to your computer with USB, then run Camera Live and double click your camera in the list to activate it. This makes the liveview output from your Canon camera available as a Syphon video stream.

But zoom.us doesn’t support Syphon video directly, it only supports webcams. So you now need to convert the Syphon stream into a virtual webcam using CamTwist Studio:

Continue reading Using a Canon DSLR as a webcam on macOS with Zoom

Raw images display corrupt in Lightroom when using FreeNAS 9.10 / afpd 3.1.8

I have so many raw Canon CR2 photos in my Lightroom library that they won’t fit on my MacBook, so I built myself a FreeNAS-based NAS to put them on. I access my NAS’s photo drive over the network from my MacBook. This worked great for many years.

However, a while back I noticed that many of my older photos displayed corrupt in Lightroom. They’d cut off halfway through and dissolve into a repeating pattern of stripes:

As you can imagine, this was pretty devastating. My newer photos all displayed fine, but a good percentage of my old photos displayed corrupted, as if the bits had rotted on the disk over time. So I restored those photos to my desktop using my Crashplan backup, and those restored photos were fine. Phew!

But how had the photos ended up getting corrupted? My FreeNAS runs ZFS, which detects and repairs/reports corruption. And regular ZFS scrubs on my drive array never turned up any problems. Corruption should be impossible.

I checked the MD5-sum of the perfect photos from the backup, and checked the MD5 of the corrupt photo on my NAS. They were identical. Huh? In fact, if I just copied the photos from my NAS to my laptop using Finder, then opened them in Lightroom, the previously corrupt-looking photos displayed perfectly.

So the problem wasn’t the image files at all, the problem was the connection between my MacBook and FreeNAS. Since I’m using a Mac, I figured I should use AFP (the Apple Filing Protocol) to connect the two together. This is provided by a package on FreeNAS called “netatalk”, and it turns out that this package received an update between FreeNAS 9.2 and 9.3. Rolling back to FreeNAS 9.2 fixed the AFP corruption issue for me.

With the recent release of FreeNAS 9.10, I decided it was probably time to track down the bug and get it fixed so I could upgrade. So with the help of Ralph Boehme at netatalk, I enabled debug logging in netatalk (now at version 3.1.8) to track down the cause of the issue. In FreeNAS, this can be achieved by:

nano /usr/local/etc/afp.conf

Add these lines to the [Global] section:

log level = default:maxdebug
log file = /tmp/netatalk.log

Save and exit, then:

service netatalk stop
service netatalk start

This will start logging a ton of information to /tmp/netatalk.log (don’t let it fill up your boot drive by leaving it enabled for too long!)

I then browsed around my photos in Lightroom until a photo displayed corrupted, and noted down the filename.

By searching the log for that file, I found the problem. Lightroom would read the photos by sending a AFP_OPENFORK message to open the file, then a series of AFP_READ_EXT messages to read the file contents, then a AFP_CLOSEFORK message to finish up. This normally worked fine. However, sometimes Lightroom would want to fetch some extra attributes from the file while it was reading it by sending a AFP_LISTEXTATTR message:

<== Start AFP command: AFP_LISTEXTATTR
dirlookup(did: 1339): START
…
sys_list_eas(827C5343.CR2): file is already opened
ad_close(HF): BEGIN: {d: 1, m: 0, r: 0} [dfd: 6 (ref: 1), mfd: 6 (ref: 1), rfd: -1 (ref: 0)]
ad_close(HF): END: 0 {d: 1, m: 0, r: 0} [dfd: -1 (ref: 0), mfd: -1 (ref: 0), rfd: -1 (ref: 0)]
Finished AFP command: AFP_LISTEXTATTR -> AFP_OK

That “file is already opened” message looked suspicious to me, since it implies that AFP_LISTEXTATTR was sharing the photo’s file handle with Lightroom’s reading process, and the final part of AFP_LISTEXTATTR was calling ad_close(), hmm.

After this, every subsequent call from Lightroom to continue reading the file would fail with an error of AFPERR_EOF. In other words, fetching attributes from a file that was already opened was wrongly causing the file to be closed, sending a premature EOF to Lightroom and so cutting off the image halfway through.

Ralph came up with a patch to netatalk to fix this problem, so now all I had to do was test it. This requires building FreeNAS from source, which was quite a learning experience. The build repo for FreeNAS 9.10 is here:

https://github.com/freenas/freenas-build

I installed FreeBSD 10.3 in a VirtualBox VM on my laptop, then grabbed a copy of a reasonable-looking tagged release of the build repo (some of the newer commits looked a bit experimental):

pkg install git
git clone https://github.com/freenas/freenas-build.git
cd freenas-build
git checkout 9c46f771d3467b2c2625c752bf51398903cb309b

Now follow the instructions to install the build pre-reqs:

make bootstrap-pkgs
pkg install devel/gmake

portsnap fetch extract
cd /usr/ports/textproc/py-sphinx_numfig
# Just keep hitting OK to accept the defaults for the dependencies:
make config-recursive
make install

# This package adds a hardlink to python in /usr/local/bin/python needed for build scripts:
cd /usr/ports/lang/python
make install

Now back in the freenas-build directory, have FreeNAS fetch its source (note we have to add PROFILE=freenas9 to get FreeNAS 9.10 instead of 10):

make PROFILE=freenas9 checkout

Save the patch for netatalk into freenas-build/_BE/ports/net/netatalk3/files.

Now it’s time to build FreeNAS (this takes many hours)!

make PROFILE=freenas9 release

Once done, you’ll have a FreeNAS ISO in freenas-build/_BE/release/FreeNAS-9.10-MASTER-*/x64. I downloaded my current FreeNAS configuration, then used the ISO to install a fresh new copy of FreeNAS to a new USB stick, booted it, uploaded my old configuration, and everything worked fine! The bug was gone, and all my photos displayed correctly.

You can track FreeNAS’s progress in patching this bug on their tracker, though it’ll probably already be included in the latest build by the time you read this (the patch is already in the repo!):

https://bugs.freenas.org/issues/10284
FreeNAS + rsync to ZFS + AFP filesharing = bad idea

Unicode (as UTF-8) is a very popular format for encoding filenames on disk, but there are some subtly incompatible variants around. In particular, different operating systems have different ideas about how accents should be handled.

Mac applies something called NFD to filenames before they are stored on disk (Normalization Form Canonical Decomposition). This means that a character like the “ū” in the word “Jingū” is stored as two Unicode characters – a plain old LATIN SMALL LETTER U character, followed by a COMBINING MACRON character:

ls | grep 2009_11_03 | od -c -tx1

0000000    2   0   0   9   _   1   1   _   0   3       M   e   i   j   i
           32  30  30  39  5f  31  31  5f  30  33  20  4d  65  69  6a  69
0000020        J   i   n   g   u    ̄  **  \n
           20  4a  69  6e  67  75  cc  84  0a

Windows does the exact opposite (NFC), combining the “u” and the macron together to produce a single LATIN SMALL LETTER U WITH MACRON character.

0000000    2   0   0   9   _   1   1   _   0   3       M   e   i   j   i
           32  30  30  39  5f  31  31  5f  30  33  20  4d  65  69  6a  69
0000020        J   i   n   g   ū  **  \n
           20  4a  69  6e  67  c5  ab  0a

On Linux, I’m not sure if there is a standard, but it’s typical to find filenames encoded with NFC. If anything, the standard in Linux is that a filename is just a series of bytes and the OS shouldn’t try to mangle them by converting the characters with NFC or NFD normalization forms.

I recently set up a second computer as a FreeNAS 9.2.0 storage device, and I wanted to migrate the files from my MacBook to it. The most straightforward way to do this is to enable the Apple “AFP” network filesharing service on FreeNAS, then on the Mac, copy the files to that network share however you like. This automatically takes care of any character conversion for you.

However, I tried this and only achieved about 2MB/s transfer speeds. I would have died of old age before I would have been able to copy my terabytes of data to FreeNAS.

So, instead I used rsync to send my files directly to the ZFS storage on FreeNAS, bypassing any of its network file system protocols. This achieved a steady ~110MB/s, which is wonderful. The issue came when I went to read those same files over AFP: I could briefly see folders that contained accents in the finder, but they would disappear after several seconds, then reappear 10 seconds later, then disappear again!

The issue was that rsync, being Linux-oriented, preserves the filename encoding when sending files, so the filenames on FreeNAS ended up still in Mac’s NFD format (with accents encoded as separate characters). This is a problem because netatalk, the AFP server on FreeNAS, expects filenames on FreeNAS volumes to be encoded in the “vol charset” which is defined in its configuration file:

http://netatalk.sourceforge.net/3.0/htmldocs/configuration.html#charsets

FreeNAS doesn’t set this explicitly, so it defaults to “UTF8”. Although the netatalk manual doesn’t say it, “UTF8” actually implies “UTF8 in NFC form”, so netatalk will be unable to serve the NFD-encoded filenames that originated on my Mac correctly. What happens is that a MacOS X client lists a directory over AFP, so netatalk converts the filenames on disk (that it thinks are NFC) to NFD (a no-op, since we’ve actually put NFD filenames on there to start with). This allows the accented characters to show up properly in MacOS and the listing looks okay. But then MacOS’s finder asks for more information about a file specifically by name. Netatalk converts the NFD filename that MacOS provides to the vol charset (set to NFC form), and then tries to look it up on the filesystem. But the filename doesn’t exist on the disk in NFC form, so it can’t find the file. This causes the file to disappear again in MacOS’s Finder.

Here are three ways of solving the problem, in order from worst to best:

Option 1: Change vol charset to UTF8-MAC

Changing the vol charset to “UTF8-MAC” will fix the issue by letting netatalk know that the filenames on disk are in NFD form.

The “vol charset” setting is found in the afp.conf file at /usr/local/etc/afp.conf. But you shouldn’t edit this file, as it is automatically regenerated at various times by the script /usr/local/libexec/nas/generate_afpd_conf.py. Instead, edit that script:

# Remount root as writable so we can edit the script:
mount -uw /
nano /usr/local/libexec/nas/generate_afpd_conf.py

Find this section:

cf_contents.append("\tmax connections = %s\n" % afp.afp_srv_connections_limit)
cf_contents.append("\tmimic model = RackMac\n")
cf_contents.append("\tvol dbnest = yes\n")
cf_contents.append("\n")

Before the append("\n") line, add:

cf_contents.append("\tvol charset = UTF8-MAC\n")

Save and exit, then:

# Remount root as readonly and commit our changes to disk (takes ages on a USB flash drive, so be patient)
mount -ur /

Now on FreeNAS’s Services/Control Services page, turn AFP off and back on in order to regenerate its configuration file. You should see the new line added when you cat /usr/local/etc/afp.conf. Your Mac-encoded filenames will now serve correctly through AFP!

Option 2: Change the encoding of the filenames on FreeNAS’ disk to NFC

Alternatively, you could leave the AFP configuration alone and change the filename encoding on disk instead. This will make the files available to Mac, but with the caveat that the filenames will no longer be the same as your source files due to the encoding difference, and rsync that runs directly against ZFS will no longer consider them to be the same files.

I did this by creating a new plugin jail, then adding my ZFS volume as additional storage to that jail. From that jail’s console button, I used “pkg install convmv” to install the convmv package, which can change filename encodings. I changed the encoding to NFC like so:

convmv -f utf-8 -t utf-8 --nfc -r --no-test /mnt/my-files

(You should run without –no-test first so convmv can tell you exactly what it plans to do, before you accidentally mangle your filenames more!)

Option 3: Go back in time and copy the filenames correctly in the first place

You can avoid this whole issue in the first place by having rsync convert the filenames to NFC as they are copied to ZFS:

rsync -a --iconv=utf-8-mac,utf-8 my-files/ root@freenas.local:/mnt/my-files/

In fact, if you fix the filenames using Option 2, then do all your future rsyncs with the character conversion specified here, everything will be hunky-dory!

Search engine crawlers have a miserable cache hitrate

I’m looking to migrate some load off my main webserver/database, so I was looking into which of our pages render the slowest. While I was doing that, I discovered that most of our rendering time is due to just a few client IP addresses, and they turned out to be search indexers. If I group all requests by user agent (“robots”, which is only googlebot and bingbot, and “humans”, which is everybody else), I get:

Robot reqs:8062 total_sz:85MB avg_sz:10kB avg_upstr_time: 1925ms total_upstr_time: 15521s cache_hitrate: 51.3%
Human reqs:414898 total_sz:5132MB avg_sz:12kB avg_upstr_time: 32ms total_upstr_time: 13520s cache_hitrate: 98.7%

So the average robot request is some 60 times slower to render than the average human one. This is because they spend most of their time loading old pages that nobody else cares about, which are never in cache and incur heavy disk IO times from our database.

I plan to create a readonly database replica and second webserver which will be dedicated to handling requests from these search crawlers. That will stop the caches on our primary server from being wasted on old content that no humans want to see.

My macro shooting rig

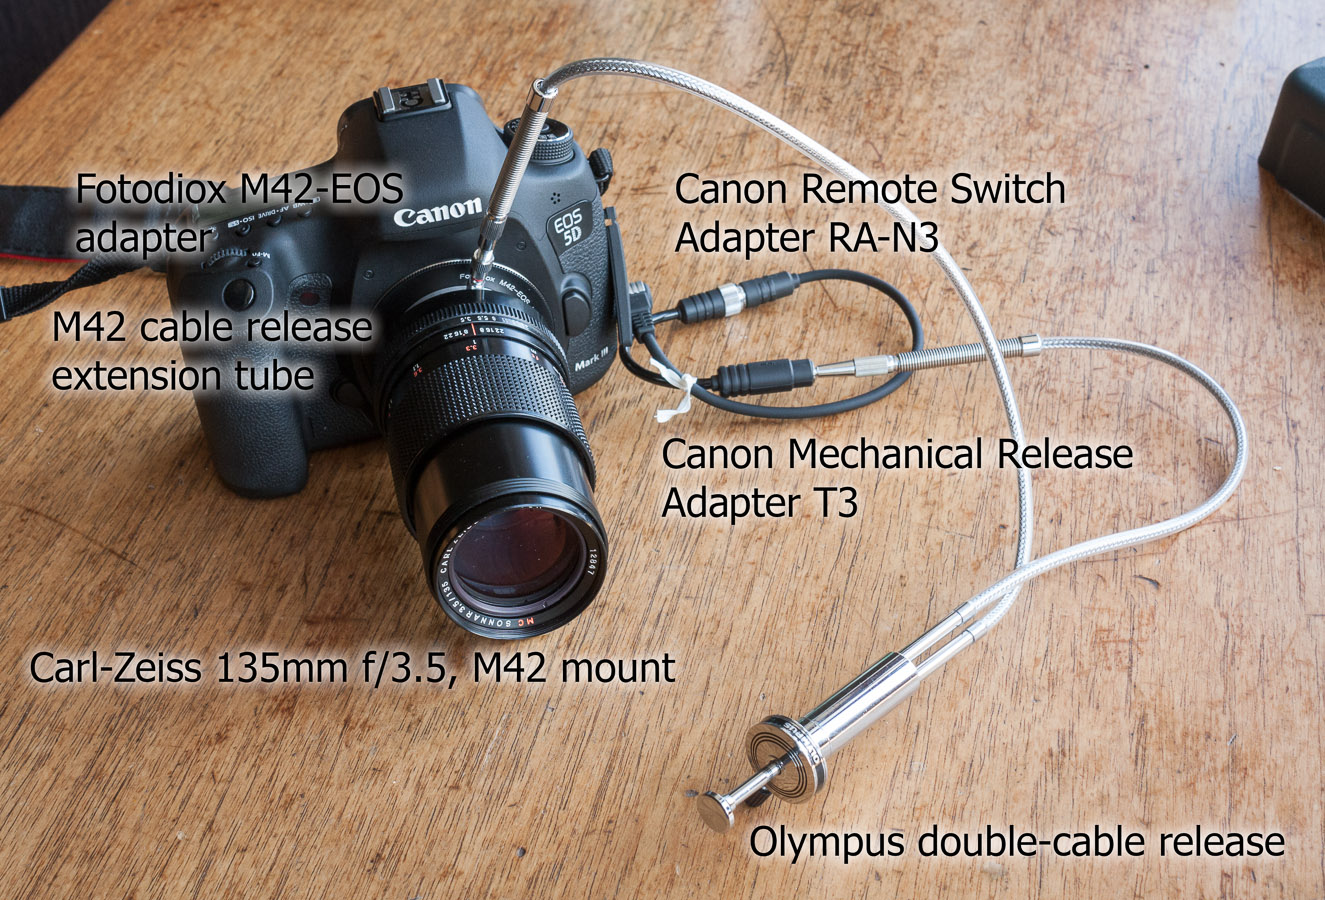
I thought I would do a little write-up on the equipment I’m shooting with for macro, since my rig is pretty unusual. I’m using a lens built for old Pentax M42-mount film cameras, along with a double cable release that allows the lens’ aperture to be closed down to my shooting aperture, and the camera’s shutter to be triggered, with one smooth motion.

My macro setup

Read on for details of these components! Continue reading My macro shooting rig

Carl Zeiss Jena Sonnar 135mm f/3.5 test on full-frame

This is a nice lens for 35mm cameras, with a built-in hood. The version I tested was M42 (Pentax screw) mount.

Briefly:

  • Vignetting is only an issue wide open, improves a lot at f/5.6 and is basically gone by f/8
  • The center of the frame is already sharp at f/3.5, and only improves a little bit at f/5
  • The corners are pretty good at f/5.6 and sharpest at f/8

Please read the full review with sample images here.