With the public release of macOS 13 Final, this beta guide is now obsolete, please see the new guide here instead
This tutorial for installing macOS 13 Ventura has been adapted for Proxmox from Kholia’s OSX-KVM project and Leoyzen’s OpenCore configuration for KVM. You can get the full sourcecode of my OpenCore release on my GitHub here.
Requirements
Since Ventura is still in closed Developer Beta, you need to be an Apple Developer and have access to a Mac (or Mac VM) to download it.
I’ll assume you already have Proxmox 7.2 installed. You also need a real Mac available in order to build the installer and fetch the OSK key.
Your Proxmox host computer’s CPU must support AVX2 (a new restriction in Ventura), so for Intel your CPU must be at least as new as Haswell. Older CPUs will panic and reboot while trying to boot the installer.
Modern AMD CPUs also support AVX2 and should work with this guide.
Since Ventura is still in Beta and support for it is preliminary in OpenCore, don’t expect full functionality (Beta software makes for a poor daily-driver).
First step: Create an installation ISO
Since Ventura is still in closed Developer Beta, you need to opt-in to the Apple beta program and grab Ventura from System Update. Just exit out of the install wizard when it says “to set up the installation of macOS 13 Beta, click Continue” and you should be left with an “Install macOS 13 Beta” app in your Applications folder.
Download my copy of the OSX-KVM repository using the download button, and unzip it:
https://github.com/thenickdude/OSX-KVM
First we need to install some build requirements. On macOS, open up the Terminal and run this command to install the command-line tools:
xcode-select --installNow in the Terminal, from the root of OSX-KVM, run:
cd scripts/ventura
make Ventura-full.img
This will a Ventura-full.img file for you. Upload this file to your Proxmox’s ISO store directory (typically /var/lib/vz/template/iso). Although we’re putting it in the ISO directory so that we can use it with Proxmox’s ISO picker later, this a raw disk image rather than a true ISO.
Prepare an OpenCore image
Download the OpenCore.iso.gz file from the newest release in my repository (you need v17 or newer), double click it to unpack it, and upload it to Proxmox’s ISO store at /var/lib/vz/template/iso. Although it has a .iso file extension, this is actually a hard disk image.
Fetch the OSK authentication key
macOS checks that it is running on real Mac hardware, and refuses to boot on third-party hardware. You can get around this by reading an authentication key out of your real Mac hardware (the OSK key). Save the first block of C code from this page as smc_read.c. In a command prompt, change into the same directory as that file and run:
xcode-select --install # If you don't already have gcc
gcc -o smc_read smc_read.c -framework IOKit
./smc_read
It’ll print out the 64 character OSK for you. Make a note of it.
Every Mac uses the same OSK, so don’t be surprised that it doesn’t look like a random string!
Create the VM
From the Proxmox web UI, create a new virtual machine as shown below.
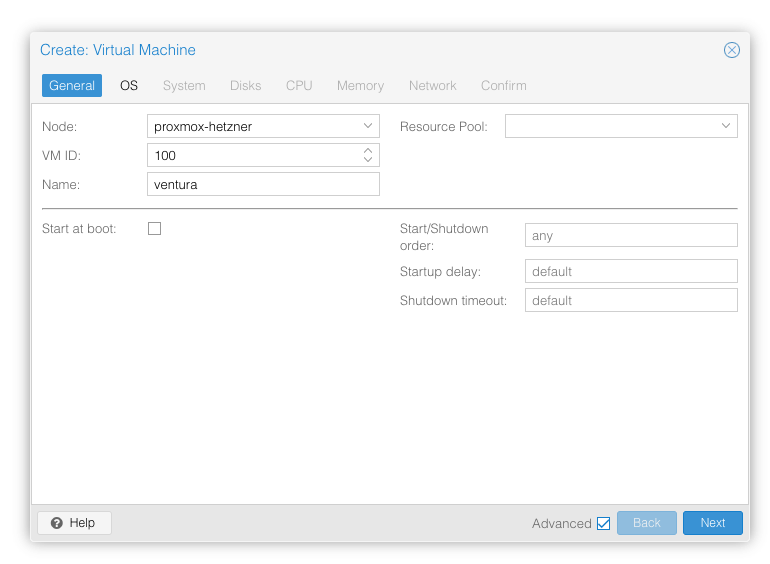
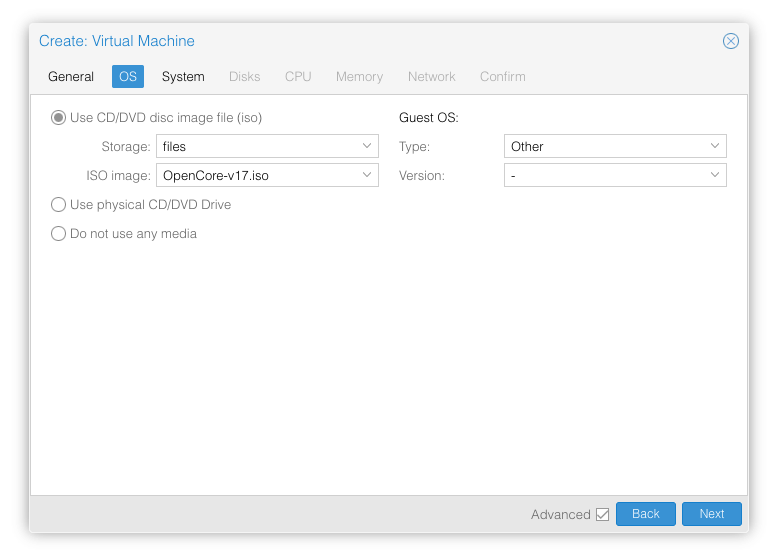
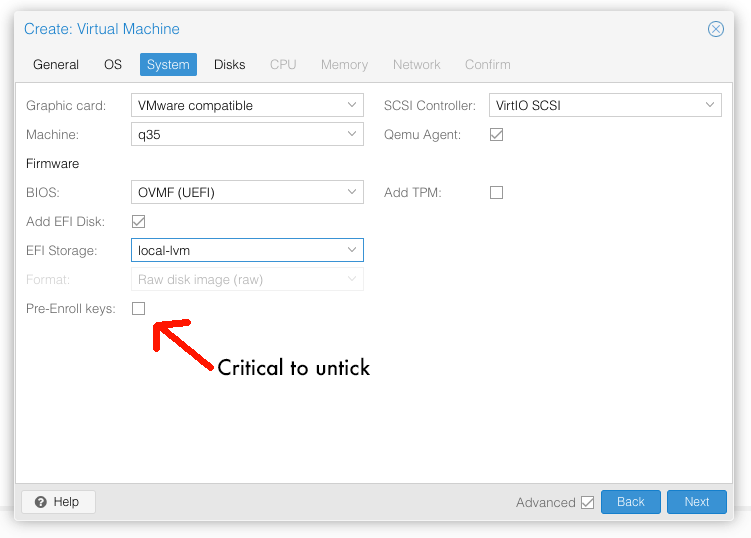
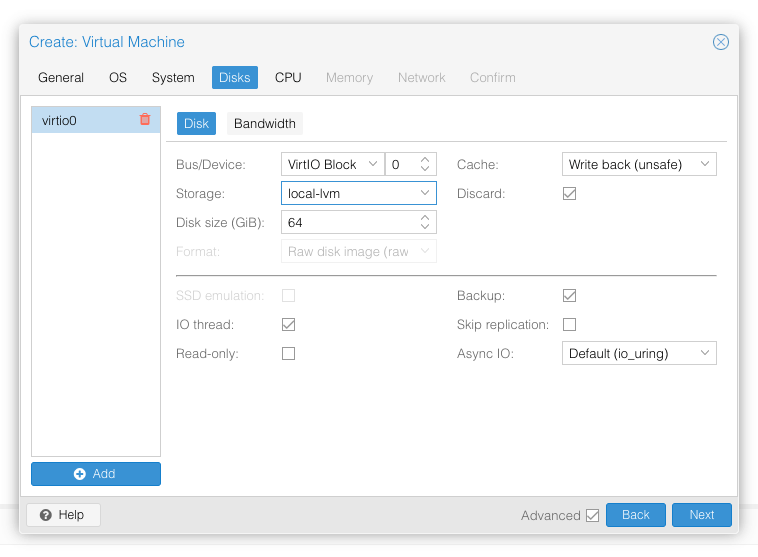
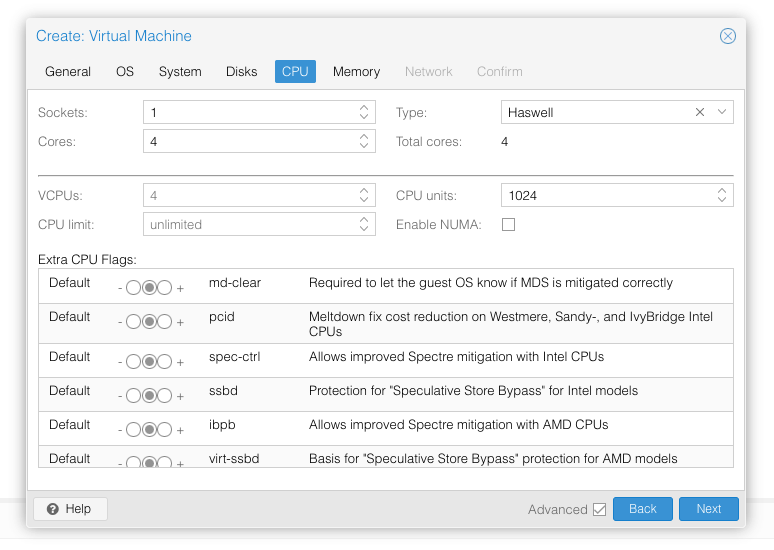
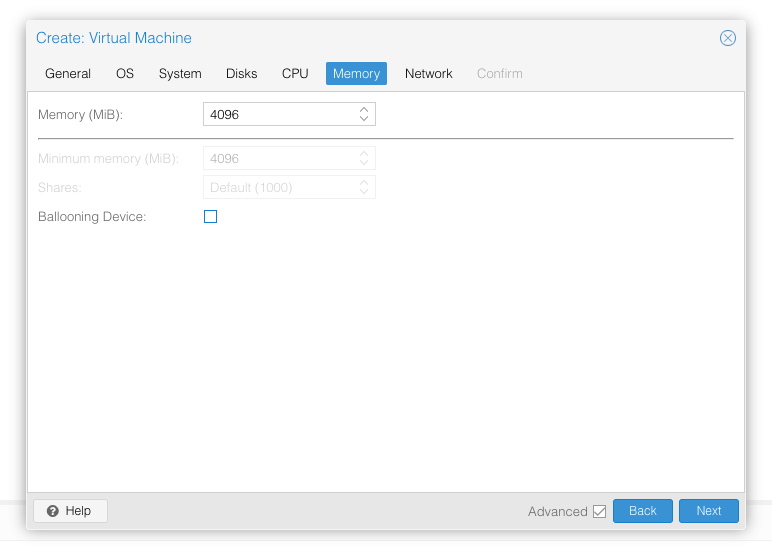
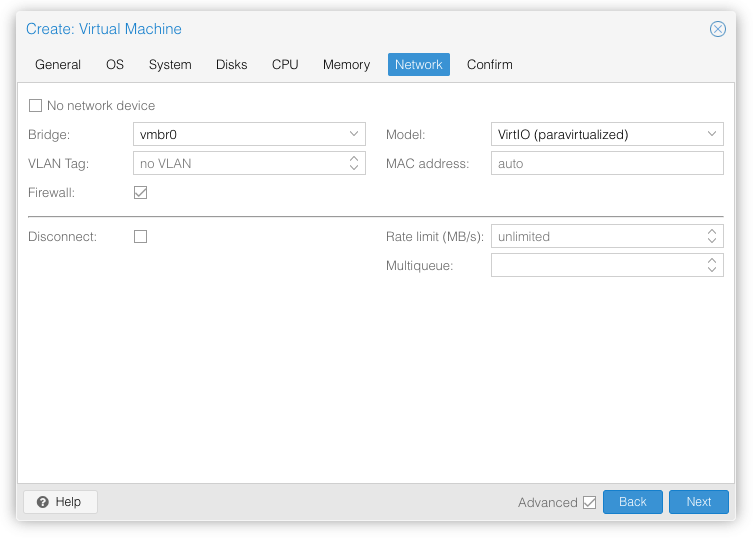
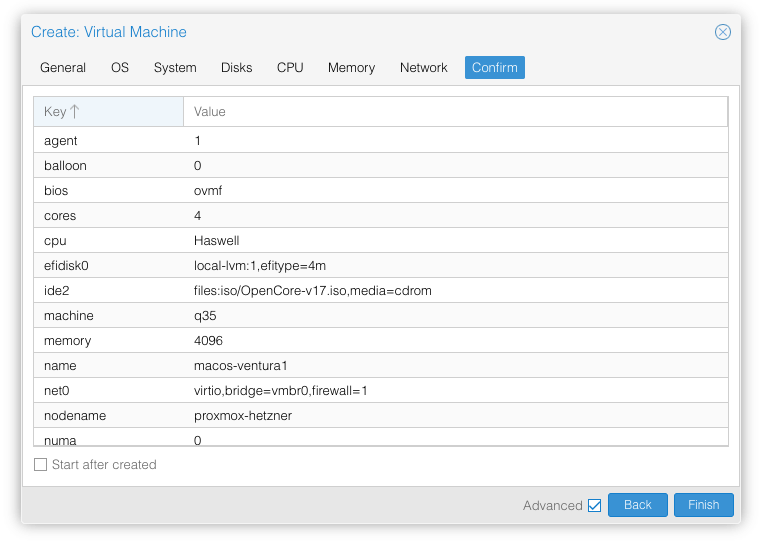
In the Options page for the VM, ensure that “use tablet for pointer” is set to “Yes” (this is the default).
In the Hardware page for the VM, add a second DVD drive at IDE0, set it to use your Ventura-full.img.
Don’t try to start the VM just yet. First, SSH into your Proxmox server so we can make some edits to the configuration files.
Edit /etc/pve/qemu-server/YOUR-VM-ID-HERE.conf (e.g. with nano or vim). Add this line, being sure to substitute the OSK you extracted earlier into the right place:
args: -device isa-applesmc,osk="THE-OSK-YOU-EXTRACTED-GOES-HERE" -smbios type=2 -device usb-kbd,bus=ehci.0,port=2 -global nec-usb-xhci.msi=off -global ICH9-LPC.acpi-pci-hotplug-with-bridge-support=off -cpu Haswell,vendor=GenuineIntel,+kvm_pv_eoi,+kvm_pv_unhalt,+hypervisor,+invtsc,kvm=on
A USB keyboard is added here because macOS doesn’t support QEMU’s default PS/2 keyboard. MSI has been disabled for the USB controller to fix QEMU panics when USB 3 devices are passed through. ACPI PCIe hotplug support has been disabled to fix VMs with passthrough devices.
Ensure the args are all on a single line!
You can remove the “+invtsc” feature from the -cpu list if your CPU doesn’t support it, or if you want to be able to migrate a running VM between Proxmox nodes.
Now find the lines that define the two “ISOs” (ide0 and ide2), and remove the “,media=cdrom” part from them. Add “,cache=unsafe” in its place. This will treat these as hard disks rather than DVD drives.
Save your changes, return to the Options tab, and change the boot order to put IDE2 (the OpenCore image) first. Your final VM configuration file should resemble this:
agent: 1
args: -device isa-applesmc,osk="..." -smbios type=2 -device usb-kbd -cpu Haswell,vendor=GenuineIntel,+kvm_pv_eoi,+kvm_pv_unhalt,+hypervisor,+invtsc,kvm=on
balloon: 0
bios: ovmf
boot: order=ide2;virtio0
cores: 4
cpu: Haswell
efidisk0: local-lvm:vm-100-disk-0,efitype=4m,size=4M
ide0: local:iso/Ventura-full.img,cache=unsafe,size=14G
ide2: local:iso/OpenCore-v17.iso,cache=unsafe,size=150M
machine: q35
memory: 4096
meta: creation-qemu=6.2.0,ctime=1655001118
name: macos-ventura
net0: virtio=...,bridge=vmbr0,firewall=1
numa: 0
ostype: other
scsihw: virtio-scsi-single
smbios1: uuid=...
sockets: 1
vga: vmware
virtio0: local-lvm:vm-100-disk-1,cache=unsafe,discard=on,iothread=1,size=64G
vmgenid: ...
Configure Proxmox
On Proxmox, run “echo 1 > /sys/module/kvm/parameters/ignore_msrs” to avoid a bootloop during macOS boot. To make this change persist across Proxmox reboots, run:
echo "options kvm ignore_msrs=Y" >> /etc/modprobe.d/kvm.conf && update-initramfs -k all -u
Install Ventura
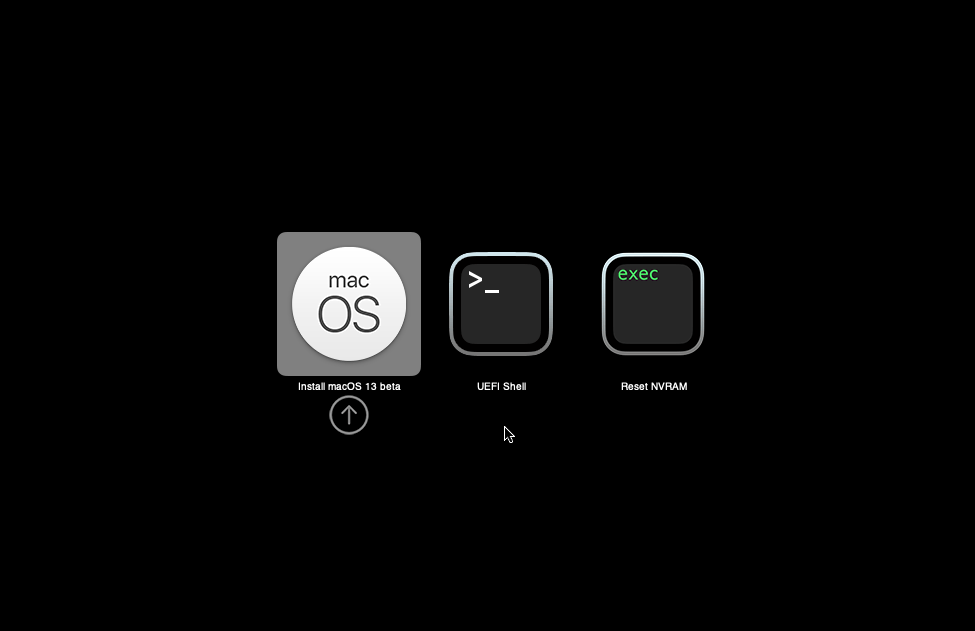
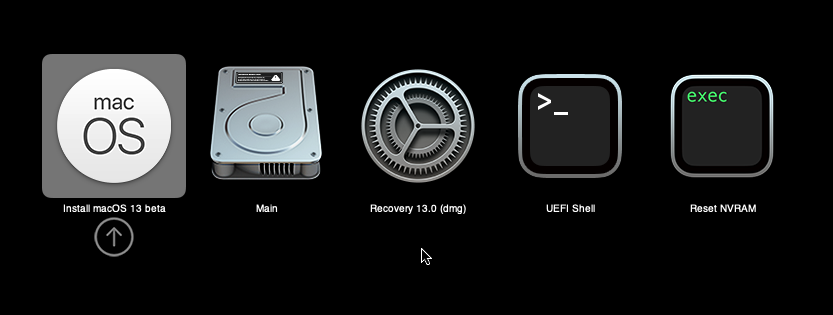
Now start up your VM, it should boot to the OpenCore boot picker:
Press enter to boot the “Install macOS 13 Beta” entry and the installer should appear. (If your keyboard isn’t working, leave the Proxmox Console page and re-enter it)
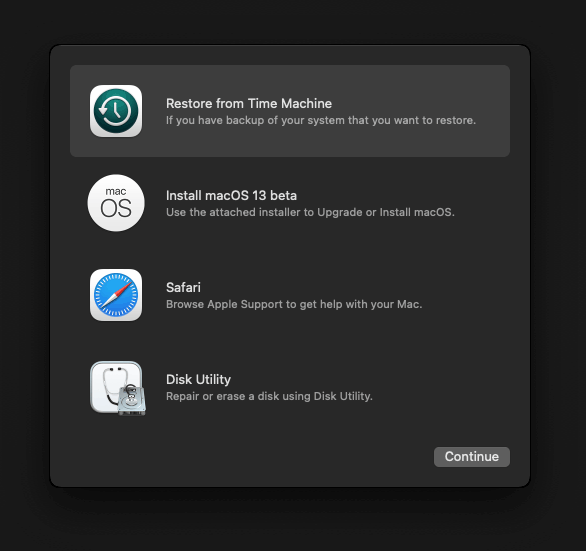
Our virtual hard drive needs to be erased/formatted before we can install to it, so select the Disk Utility option. Follow the steps below to format the disk:
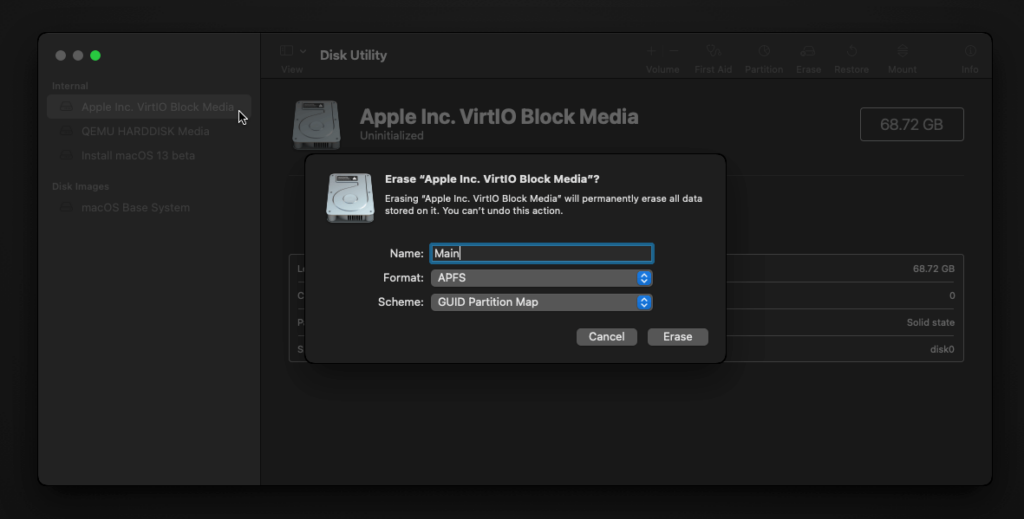
Now you can quit Disk Utility from the top menu (Disk Utility > Quit Disk Utility), and we’re ready to begin installation!
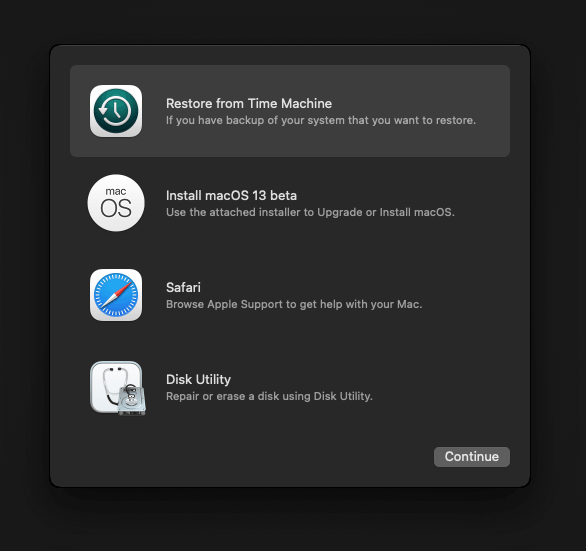
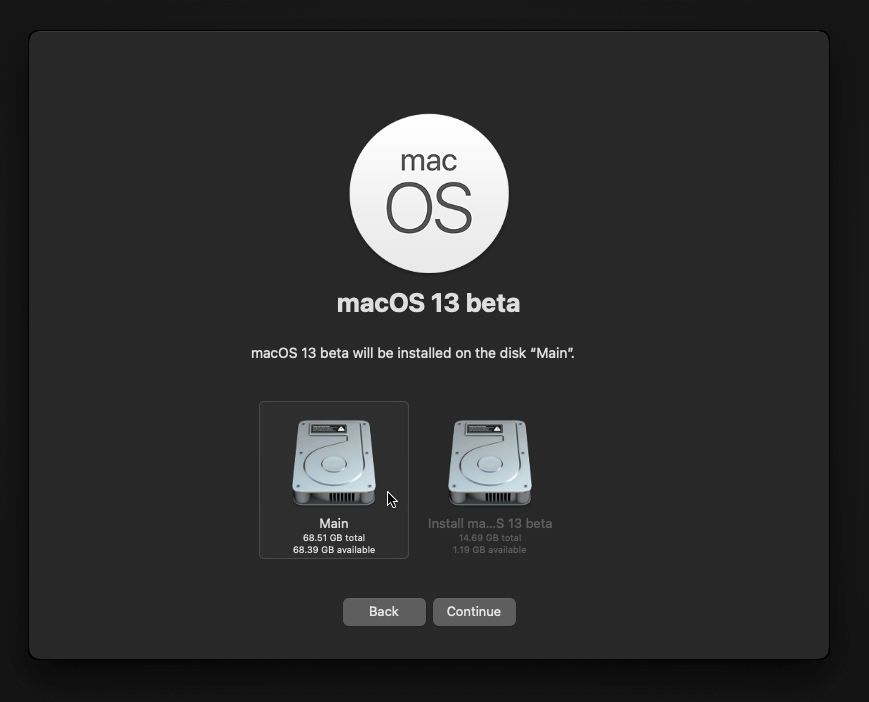
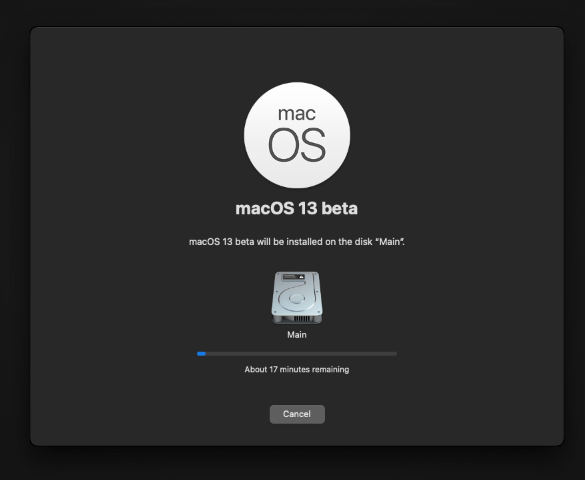
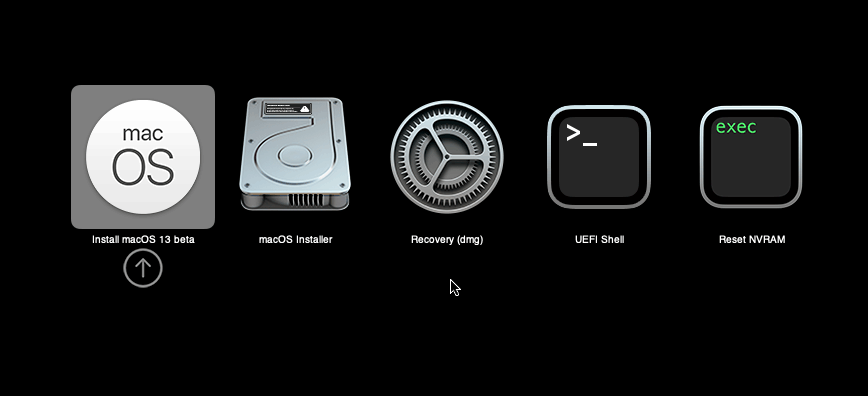
After the first stage of installation, the VM will reboot a couple of times in quick succession, and each time you must manually pick the “macOS Installer” entry (the second one here, with the hard disk icon) to continue installation. It will not be selected for you automatically:
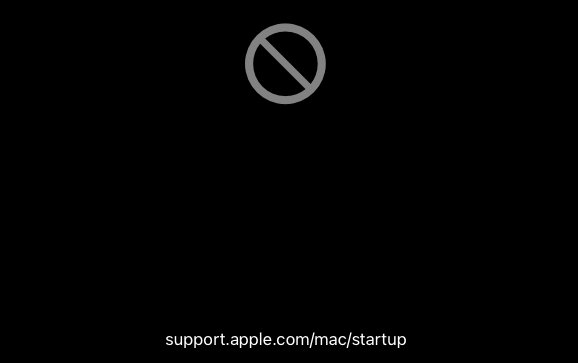
If your keyboard isn’t responding on this screen, exit the Console tab in Proxmox and re-enter it. If you get a “prohibited” sign like this appearing, hit the Reset button on the VM to try again:
Now the installation is nearly complete and the macOS Installer entry disappears, so pick the name of your main disk to boot instead (mine’s called Main).
It’ll reboot a couple more times, so just keep picking the “Main” entry until you finally boot into Ventura!
Answer the initial install questions, and you’ll be logged on! Note that you will want to hold off on logging into your Apple ID until you’ve configured your Mac’s serial number in OpenCore (because otherwise a Mac with the default shared serial number in my OpenCore image will be added to your Apple ID).
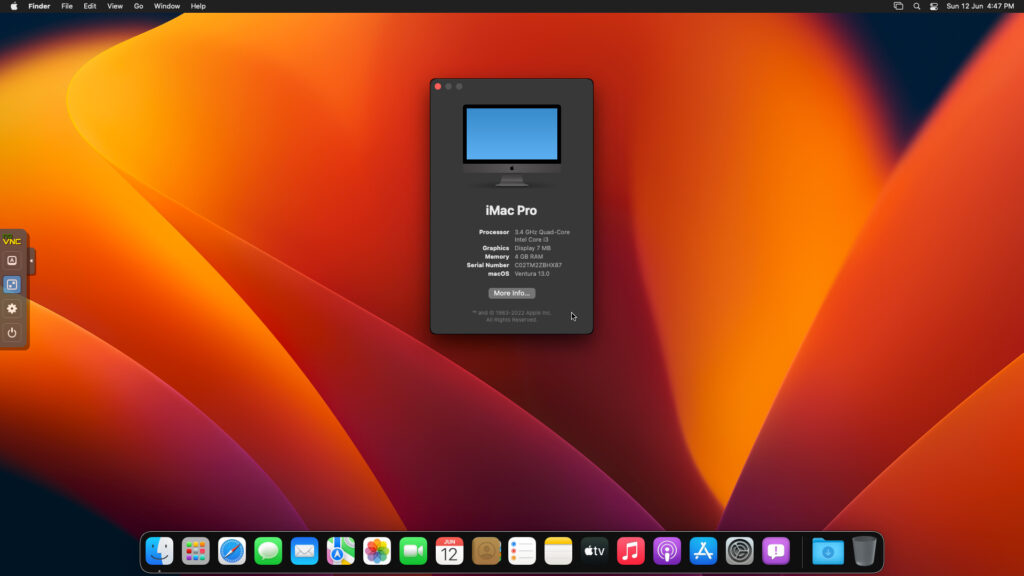
Note that it will be really sluggish for a few minutes after the first boot while the system performs housekeeping tasks.
Make the OpenCore install permanent
We’re currently booting using OpenCore from the attached OpenCore ISO. Let’s install that to the hard drive instead. Pop open Terminal and run “diskutil list” to see what drives we have available.
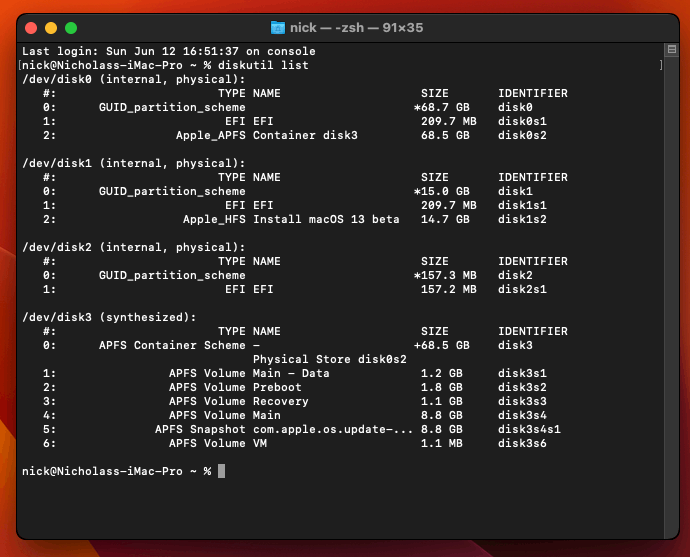
Use “sudo dd if=<source> of=<dest>” to copy the “EFI” partition from the OpenCore CD and overwrite the EFI partition on the hard disk. The OpenCore CD is the small disk (~150MB) that only has an EFI partition on it, and the main hard disk is the one with the large (>30GB) Apple_APFS “Container” partition on it.
In my case these EFI partitions ended up being called disk2s1 and disk0s1 respectively, so I ran “sudo dd if=/dev/disk2s1 of=/dev/disk0s1” (note that if you get these names wrong, you will overwrite the wrong disk and you’ll have to start the installation over again!).
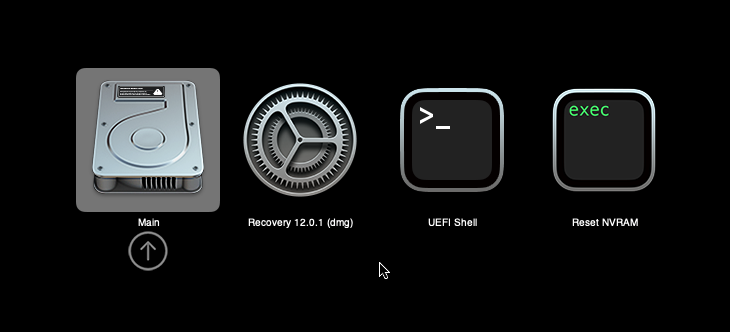
Now shut down the VM, and remove both the OpenCore and the Ventura installer drives from the Hardware tab. On the Options tab, edit the boot order to place your virtio0 disk as the first disk. Boot up. If everything went well, you should see the OpenCore boot menu, and you can select your “Main” disk to boot Ventura:
Sleep management
I found that I was unable to wake Ventura from sleep using my mouse or keyboard. If you encounter the same problem, you can either disable system sleep in Ventura Energy Saver settings to avoid the issue, or you can manually wake the VM up from sleep from Proxmox by running:
qm monitor YOUR-VM-ID-HERE
system_wakeup
quit
Editing your OpenCore/EFI settings
The Configuration.pdf that explains the OpenCore config.plist file can be found along with the OpenCore release on my GitHub.
To mount your EFI partition in macOS so you can edit your config.plist, first check the “identifier” of your EFI partition in the terminal:
~$ diskutil list
/dev/disk0 (external, physical):
   #:                   TYPE NAME              SIZE       IDENTIFIER
   0:  GUID_partition_scheme                  *512.1 GB   disk0
   1:                    EFI EFI               209.7 MB   disk0s1
   2:             Apple_APFS Container disk1   511.9 GB   disk0s2
Then you can mount it like so:
sudo mkdir /Volumes/EFI
sudo mount -t msdos /dev/disk0s1 /Volumes/EFI
Now you can edit /Volumes/EFI/OC/config.plist with your favourite text editor to make your changes. (TextEdit is not a great choice because it likes to insert curly quotes into the file and otherwise break things, there are some dedicated plist editors available such as XCode).
If you’re unable to boot macOS, you can edit the config.plist using the “UEFI Shell” option in the OpenCore boot menu instead.
Enter “FS0:” and press enter to open up the first available filesystem, then run “edit EFI\OC\config.plist” (if the file isn’t found, try switching to another filesystem like fs1:). When you’re done editing, press control+Q to exit, “Y” to save, then run “exit” to return to the OpenCore menu. You need to reboot for your changes to take effect.
If you prefer, you can edit config.plist from the comfort of your Proxmox host instead. If you’re booting from an attached OpenCore.img file, you can mount that file as a disk on the host. If you’re booting from the VM’s disk instead, it must be in raw format in order to be mounted (e.g. typical LVM or ZFS usage) rather than qcow2.
# Mount an OpenCore image:
losetup --partscan /dev/loop0 /var/lib/vz/template/iso/OpenCore-v15.img
# or a VM boot disk:
losetup --partscan /dev/loop0 /dev/zvol/tank/vms/vm-100-disk-1

mount /dev/loop0p1 /mnt
Now the contents of that first partition are available in /mnt, so you can edit /mnt/EFI/OC/config.plist in your favourite editor. When you’re done, do this to unmount the disk:
umount /mnt
losetup --detach /dev/loop0
Automatic boot
In config.plist, you can set Misc/Boot/Timeout to a non-zero value to allow the default boot option be chosen automatically after that delay in seconds. I’ve disabled this by default because it causes the installer ISO to re-enter its main menu instead of continuing the second stage of installation.
You can set the default boot option by pressing control+enter on it.
Verbose boot
To boot macOS in Verbose mode to diagnose boot problems, at the OpenCore boot menu press Cmd+V before pressing enter to boot macOS (you don’t need to hold it down).
If there is a kernel panic during boot and it reboots too quickly to be read, edit config.plist to add “debug=0x100” to the kernel arguments.
Changing screen resolution
To change macOS’ screen resolution, you need to edit the UEFI/Output/Resolution setting in config.plist, the default is 1920×1080@32.
You should be able to change this to any of the modes that the system OVMF menu offers (hit F2 at the start of guest boot and choose “Device Manager/OVMF Platform Configuration” to see which resolutions are available).
Video performance
Because there is no guest video acceleration available for macOS, video performance is poor.
In Google Chrome in the guest you will need to toggle off the setting to “use hardware acceleration when available” to improve issues with elements not being drawn or flickering (especially video). Safari may be a better choice.
macOS’s built in “Screen Sharing” feature offers dramatically better framerates and latency than Proxmox’s browser-based VNC console, so if you have a real Mac to act as a viewing console, you can enable that in the VM’s “Sharing” settings and connect to the VM using the Screen Sharing app from your Mac instead:
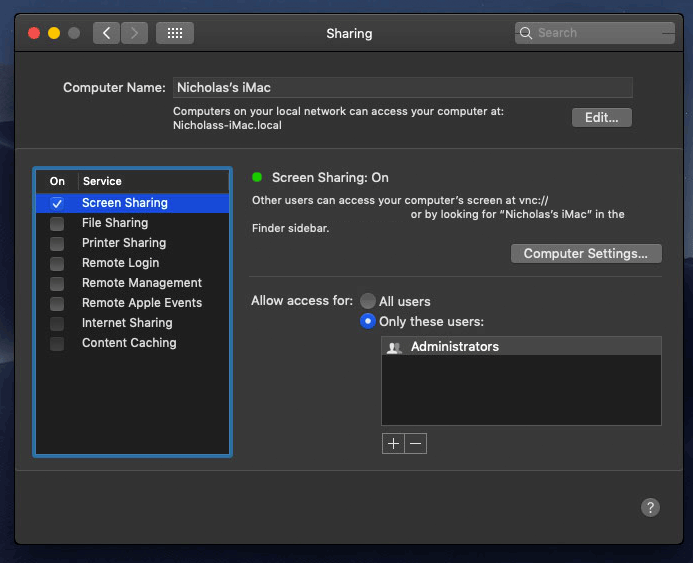
Apparently Screen Sharing is also compatible with VNC clients like RealVNC, so you should be able to connect to it from Linux or Windows consoles using RealVNC.
The real magic bullet for video performance is to pass through a compatible video card using PCIe passthrough (though note that macOS now only supports a handful of very old NVidia cards). This offers near-native performance. You can read more about how I’m using PCIe passthrough on my own installation here.
USB passthrough
Since I want to use this as my primary computer, I want to use a USB keyboard and mouse plugged directly into Proxmox, rather than sending my input through the web VNC console.
Proxmox has good documentation for USB passthrough. Basically, run “qm monitor YOUR-VM-ID-HERE”, then “info usbhost” to get a list of the USB devices connected to Proxmox:
qm> info usbhost
 Bus 3, Addr 12, Port 6, Speed 480 Mb/s
 Class 00: USB device 8564:1000, Mass Storage Device
 Bus 3, Addr 11, Port 5.4, Speed 12 Mb/s
 Class 00: USB device 04d9:0141, USB Keyboard
 Bus 3, Addr 10, Port 5.1.2, Speed 12 Mb/s
 Class 00: USB device 046d:c52b, USB Receiver
 Bus 3, Addr 9, Port 14.4, Speed 12 Mb/s
 Class 00: USB device 046d:c227, G15 GamePanel LCD
 Bus 3, Addr 8, Port 14.1, Speed 1.5 Mb/s
 Class 00: USB device 046d:c226, G15 Gaming Keyboard
In this case I can add my keyboard and mouse to USB passthrough by quitting qm, then running:
qm set YOUR-VM-ID-HERE -usb1 host=04d9:0141
qm set YOUR-VM-ID-HERE -usb2 host=046d:c52b
This saves the devices to the VM configuration for you. You need to reboot to have the new settings apply.
You can also pass through USB devices by passing through an entire USB controller using Proxmox’s PCIe passthrough feature, which gives much better compatibility.
Odd core counts
If your host CPU is AMD, you might have a core count which is divisible by 3, like 6 cores. macOS doesn’t like it if the core count isn’t a power of 2 (1, 2, 4, 8), but it doesn’t mind odd socket counts.
So in order to pass 6 total cores, configure the VM for 3 sockets and 2 cores per socket.
Fixing “guest boots to UEFI shell”
If your guest ends up booting to the UEFI shell instead of showing the OpenCore boot menu, especially if you’ve just updated OpenCore to a new version, you’ll need to edit the guest’s UEFI boot entries to fix this.
At the very start of guest boot, hit F2 to enter guest UEFI settings.
First we’ll remove the old entries. Choose the Boot Maintenance option, then Boot Options -> Delete Boot Option. Use the spacebar to tick any old Clover or OpenCore entries (avoid ticking the EFI Internal Shell option, you want to keep that!). Select “Commit Changes and Exit”.
Now we’ll add the correct entry for OpenCore back in. Select Add Boot Option. Navigate through the device tree to EFI/OC/OpenCore.efi and select it, name this new option “OpenCore” or similar. Again Commit Changes and Exit.
Go to the Change Boot Order and move OpenCore to the top. Commit Changes and Exit.
Now back out to the main menu and choose Reset, and you should successfully boot into OpenCore this time.
Fixing iMessage
iCloud and the App Store should already be working for you, but for iMessage support you must follow these steps to mark your network adapter as built-in:
https://dortania.github.io/OpenCore-Post-Install/universal/iservices.html#fixing-en0
Disabling SIP (System Integrity Protection)
You can disable SIP by selecting the Recovery option from the OpenCore boot menu, then use the top menu to open the Terminal and run csrutil disable --no-internal. Then reboot.
This may be needed to run unsigned kexts or perform other hacks.

Very cool! Will work through this when I have a good block of free time.
You mention GPU passthrough:
note that macOS now only supports a handful of very old NVidia cards
Does it follow that Ventura is now incompatible with these?
AMD Sapphire Radeon RX 580 Pulse 8GB (11265-05-20G)
macOS venture does indeed support an RX 580, many previous macOS versions support it too
Thank you! I don’t know what I would do without your instructions. Small question: I’ve updated proxmox kernel from 5.13 to 5.15 and macos doesn’t start anymore. OpenCore loads, macos starts to load and than vm reboots after “apple” screen (apple without progress bar). I rolled back to kernel 5.13
Do you have PCIe passthrough devices attached?
Yes, I do: I passthrough GPU with romfile and all USBs through PCIe. And you are right – I tried disable PCIe passthrough and it works with VNC console – macos loads successfully. But passthrough works because I can to see the OpenCore menu and able to use the usb keyboard in it. The problem is during macos loading – it reboots during from the “apple logo” screen.
Most likely your passthrough is actually broken, check dmesg for errors about BARs.
If the problem is that bootfb is holding on to the card, see here:
https://www.reddit.com/r/VFIO/comments/umuyxf/vm_works_on_5175200fc35_but_not_5175200fc36/i8bj219/
You are my hero! Adding “initcall_blacklist=sysfb_init” to GRUB_CMDLINE_LINUX_DEFAULT works! Thank you!
My proxmox is 7.2.5. I followed above steps to set vm and vmid.conf. After start vm, [Install macOS 13 Beta] does not show up. Is there any thing I might wrong?
If you missed the steps to replace media=cdrom with cache=unsafe it will cause that
I am sure I did change 2 ISO from media=cdrom to cache=unsafe in 108.conf (vmid is 108)….. PC CPU is amd ryzen 5. I checked the content with Monterey in your previous post. Do I need to add +pcid,+ssse3……?
Yes, but it won’t fix your problem. Post your whole VM config
Here is my VM config. Please help to see where goes wrong.
Thanks!
——————————————
agent: 1
args: -device isa-applesmc,osk=”***” -smbios type=2 -device usb-kbd,bus=ehci.0,port=2 -global nec-usb-xhci.msi=off -global ICH9-LPC.acpi-pci-hotplug-with-bridge-support=off -cpu Haswell,vendor=GenuineIntel,+kvm_pv_eoi,+kvm_pv_unhalt,+hypervisor,kvm=on
balloon: 0
bios: ovmf
boot: order=ide2;virtio0
cores: 4
cpu: Haswell
efidisk0: vm2-zfs:vm-108-disk-0,efitype=4m,size=1M
ide0: local:iso/Ventura-full.img,cache=unsafe,size=14G
ide2: local:iso/OpenCore-v17.iso,cache=unsafe,size=150M
machine: q35
memory: 4096
meta: creation-qemu=6.2.0,ctime=1655990161
name: Ventura
net0: virtio=BA:B3:5B:42:E6:B7,bridge=vmbr0,firewall=1
numa: 0
ostype: other
scsihw: virtio-scsi-pci
smbios1: uuid=f41bb66a-fad4-433d-b163-9ce9689c18da
sockets: 1
vga: vmware
virtio0: vm2-zfs:vm-108-disk-1,cache=unsafe,discard=on,iothread=1,size=64G
vmgenid: 6edebc3f-7d01-466a-a6ab-a32c843eb227
Your config looks okay, I’d try rebuilding the installer image.
Thanks, I will take a try when revised image available.
I download beta 2 and replace it in ide0. [Install macOS Ventura beta] showed.
But, another issue happened. After click it, it loading, and then reboot!
Sometime, installation menu showed, few moments later, reboot!
1st time, I think it would be beta image issue. the 2nd time, same issue?
Run this command on the host to see if your host is having issues with the TSC:
dmesg | grep -i -e tsc -e clocksource
Look for an error like “TSC found unstable after boot, most likely due to broken BIOS. Use ‘tsc=unstable’.”
If that’s the issue, sometimes doing a full host poweroff (not a warm reboot) will fix it.
Recent versions of macOS panic if they see the TSC go backwards due to an unstable host TSC.
I thinked I do not get any error message in clocksource issue as below result. Would you please help to see if any problem.
————————————————-
root@pve:/etc/pve/qemu-server# dmesg | grep -i -e tsc -e clocksource
[ 0.000000] tsc: Fast TSC calibration using PIT
[ 0.000000] tsc: Detected 3593.181 MHz processor
[ 0.060778] clocksource: refined-jiffies: mask: 0xffffffff max_cycles: 0xffffffff, max_idle_ns: 7645519600211568 ns
[ 0.152088] clocksource: hpet: mask: 0xffffffff max_cycles: 0xffffffff, max_idle_ns: 133484873504 ns
[ 0.492108] clocksource: tsc-early: mask: 0xffffffffffffffff max_cycles: 0x33cb295f7cd, max_idle_ns: 440795205948 ns
[ 0.633208] clocksource: jiffies: mask: 0xffffffff max_cycles: 0xffffffff, max_idle_ns: 7645041785100000 ns
[ 0.673153] clocksource: Switched to clocksource tsc-early
[ 0.684863] clocksource: acpi_pm: mask: 0xffffff max_cycles: 0xffffff, max_idle_ns: 2085701024 ns
[ 1.712128] tsc: Refined TSC clocksource calibration: 3593.225 MHz
[ 1.712136] clocksource: tsc: mask: 0xffffffffffffffff max_cycles: 0x33cb5349eda, max_idle_ns: 440795345470 ns
[ 2.095220] clocksource: Switched to clocksource tsc
————————————————-
Awesome!
May I know you exactly PVE and kernel version ?
Proxmox 7.1-12 and kernel 5.13.19-6-pve
My pve is 7.2-4 and kernel 5.13.19-6-pve.
But after I click “Install macOS 13 Beta”, I got reboot everytime.
Here is the log:
Couldn’t alloc class “ApplekeyStoreTest”
ACPI: FRCS Ox000O0OOO7EB5A0O0 000040
ACPI: APIC Ox000000007EB2AO00 OOOOFO (v01 BOCHS BXPC 00000001 BXPC 00000001)
ACPI: SSDT Ox000000OO7EB29000 O00OCA (v01 BOCHS VMGENID 00000001 BXPC 00000001)
ACPI: HPET Ox000000007EB28000 000038 (v01 BOCHS BXPC 00000001 BXPC 00000001)
ACPI: MCFG Ox000OOO0O7EB27000 00003C (v01 BOCHS BXPC 00000001 BXPC 00000001)
ACPI: WAET Ox000000007EB26000 000028 (v01 BOCHS BXPC 00000001 BXPC 00000001)
ACPI: BGRT Ox000000007EB25000 000038 (v01 INTEL EDK2 00000002 01000013)
ACPI: SSDT Ox00000OOO7EB7COOO 00010B (v02 ACDT SsdtEC 00001000 INTL 20190509)
ACPI: SSDT OxD000D0OO7EB7AOOO OOOOB1 (v02 CpuRef CpuPlug D000300O INTL 20190509)
ACPI: SSDT Ox000000007EB79000 000064 (v02 KGP DTPG 00001000 INTL 20190509)
ACPI: SSDT Ox000000007EB78000 O000A3 (v01 KGP DEMUUSB D0QDDODO INTL 20190509)
ACPI Error: [S38_] Namespace Lookup failure, AE_NOT_FOUND (20160930/dswload-292)
ACPI Exception: AE_NOT_FOUND, During name Lookup/catalog (20160930/psobject-310)
ACPI Exception: AE_NOT_FOUND,(SSDT: QEMUUSB) while Loading table (20160930/tbxf load-319)
ACPI Error: 1 table Load failures, 5 successful (20160930/tbxfload-342)
pci (build 20:22:57 May 24 2022), flags Dxc3080
AppleACPICPU: Processor Id=Q LocalApicId=0 Enab led
AppleACPICPU: Processor Id=1 LocalApicId=1 Enabled
AppleACPICPU: Processor Id=2 LocalApicId=2 Enab led
AppleACPICPU: Processor Id=3 LocalApicId=3 Enabled
AppleACPICPU: Processor Id=4 LocalApicId=4 Enab Led
AppleACPICPU: Processor Id=5 LocalApicId=5 Enab led
AppleACPICPU: Processor Id=6 LocalApicId=6 Enabled
AppleACPICPU: Processor Id=7 LocalApicId=7 Enab led
AppleACPICPU: Processor Id=8 LocalApicId=8 Enabled
AppleACPICPU: Processor Id=9 LocalApicId=9 Enab led
AppleACPICPU: Processor Id=10 LocalApicId=10 Enabled
AppleACPICPU: Processor Id=11 LocalApicId=11 Enab led
AppleACPICPU: Processor Id=12 LocalApicId=12 Enabled
AppleACPICPU: Processor Id=13 LocalApicId=13 Enabled
AppleACPICPU: Processor Id=14 LocalApicId=14 Enabled
AppleACPICPU: Processor Id=15 LocalApicId=15 Enabled
no external trust caches found (segment Length is zero)
IOAPIC: Version Ox11 Vectors 64:87
ACPI: Executed 3 blocks of module-level executab le AML code
ACPI: sleep states S3 S4 S5
Couldn’t alloc class “AppleKeyStoreTest”
Couldn’t alloc class “ApplekeyStoreTest”
By the way, I removed arg: -global ICH9-LPC.acpi-pci-hotplug-with-bridge-support=off with machine: pc-q35-6.0
Any idea with that?
Hi,
Thanks for the manual, trying to follow it but i run into an error.
When i select the disk to install MacOS on i get a pop-up that i need to login as an administrator to unlock the disk.
“In order to continue installing macOS Ventura beta, you need to log in as an administrator. Install macOS Ventura beta needs to unlock your disk.”
While i have created a new disk.
This is how you can fix it: https://elitemacx86.com/threads/how-to-fix-administrator-user-name-and-password-requirement-during-macos-ventura-clean-install.943/
My B365M D3SH Motherboard & Radeon 570 GPU won’t pass through to Hackintosh Ventura. I turned on VT-D in the bios settings. I blacklisted all the drivers in Proxmox and gottten that setup. It’s just every time I add the PCI device, the screen that’s running Proxmox turns black. The VM doesn’t even appear on the screen like it’s suppose to.
Did you added a rom file for your gpu already?
I’m having trouble with my 7950.
Ventura I can’t boot with vmware display disabled. It shows the machine running in proxmox but I can’t vnc or connect in any way.
I tried restoring a version to montery.
Now I can’t boot even with the vmware display. It get’s stuck on the apple logo.
can you please share you config.plist. I saw you share you link above in another comment but it’s not longer there. I think it has to do wtih my mac type being mac1-1
Hello!
Which Apple Device Identifier do you use?
iMac Pro 1,1?
Best regards,
M.L.
Yes that’s what I’m using
Thank you for the great write-up. I see that the public beta’s are finally out for Ventura and have tried substituting it into your instructions. However, as soon as I try to load the installer, the guest crashes and reboots itself. I verified my processor was listed as Haswell and checked all of the other settings. I also reuploaded the ISO from my MBP to make sure something did not happen in the transfer. Are there any updates that are required for the public beta to work?
Thanks!!
What’s your host’s actual CPU model?
I haven’t tested the public beta yet myself
I have a Intel Core i7-10710U.
In case I was not clear, what I meant was, I checked the guest was listed as a Haswell since you mentioned in the write-up that older models would cause the installer to fail loading.
Also have a boot loop with Ventura Public Beta 4.
It sounds like beta 4 requires an update to OpenCore
Probably, would you mind testing for us? I updated my oc to latest version and using the OSX github openhub v17 you linked as the boot picker. I select the Ventura installer, progress bar moves a little then it reboots.
Update – updated the V17 opencore img to include 0.8.3 opencore, changed my vcpu to 1 core 1 thread and now Ventura boots to disk image utility – which is way further than I ever got before. Fingers crossed.
same reboot happening here
Hi,
Have you ever managed to find out what is causing this issue? I was seeing this very same issue when installing Mac OS X Monterey, the VM kept rebooting after opening the installer. When setting the cpu to 1 socket and 1 core I was able to install and now use the VM. 1 vcpu is not ideal however, would be nice to have a bit more power. How can we fix this?
I have the same issues with the current beta.
At first I can’t see the Ventura Install Icon. If I start the boot.efi manualy a few seconds after the apple apears and the progress bar starts loading my VM will reboot.
Nicholas Sherlock, I have done everything on your page and everything works fantastic accept for my mouse and keyboard. I try to pass them through to my vm and they don’t work. Well, the keyboard works at the OpenCore screen, but when it boots into Ventura, both the keyboard and mouse don’t work. I know that they’re passthrough capable, because they worked when you did Monterey. I just hope there’s a solution to our usb devices. Is there something I am missing in the arguments? I can’t move the mouse or keyboard when they’re even passed through.
Did you set this up recently? Did you use the public beta? I have tried it recently and it has not worked for me.
Did you make any tweaks to the process?
Marc, I got it all working with Nicholas’s Guide, but the problem is theres no USB support even when you pass through devices. You can get the keyboard working in the OpenCore screen, but after it all boots up to the login screen, it stops working. The mouse doesn’t move or work at all.
I assume you used the public beta? Or did you use the developer version?
I cannot get into the installer, so I would be of no help to you. Like you, my keyboard works at that point.
what’s the meaning of hyper v software if it cant pass through this new stupid AVX2 restriction by apple that they forced on people ??? :((((
I have 3930k sandy bridge worth 400 dollar 10 years ago and i cant even install the new stupid os x ventura cause of that ???
Is there other hyper v software that can bypass that issue and emulate AVX2 so i can install and enjoy ventura with my cpu ?
Great write up Nick – I’ve followed your guides for many past versions. Currently, I’m stuck on the UEFI shell. I’ve tried deleting all the options and explicitly adding the OpenCore booter, but it doesn’t seem to work. I’m using the latest ISO from your repo. Any tips?
Detach and delete the EFI disk from the Hardware tab, then re-add one, and be sure to un-tick “pre-enroll keys” in the dialog.
Tried that a few times – def did uncheck pre-enroll
I tried re-creating from scratch entirely and still get the same result. I wonder if it is something specific about 7.2-3? Or an Intel i7-8700K?
SOLVED: corrupt install ISO. When I went back and ran the MakeFile commands on their own, I realized that the createinstallmedia fails silently. Apparently the path has to be /Applications/… I was storing the install.app on a NAS drive.
New problem: same as others above – current developer beta crashes at boot. I’ll dig into the OC config later and see what I can find.
My ultimate goal is to use cpu: host since I’m on a Coffee Lake CPU.
adding SOLVED: corrupt install ISO. When I went back and ran the MakeFile commands on their own, I realized that the createinstallmedia fails silently. Apparently the path has to be /Applications/… I was storing the install.app on a NAS drive.
New problem: same as others above – current developer beta crashes at boot. I’ll dig into the OC config later and see what I can find.
My ultimate goal is to use cpu: host since I’m on a Coffee Lake CPU.
Following up to my comment, here’s my conf:
agent: 1
args: -device isa-applesmc,osk=”*********” -smbios type=2 -device usb-kbd,bus=ehci.0,port=2 -global nec-usb-xhci.msi=off -global ICH9-LPC.acpi-pci-hotplug-with-bridge-support=off -cpu Haswell,vendor=GenuineIntel,+kvm_pv_eoi,+kvm_pv_unhalt,+hypervisor,+invtsc,kvm=on
bios: ovmf
boot: order=ide2
cores: 8
cpu: Haswell
efidisk0: local:125/vm-125-disk-0.qcow2,efitype=4m,size=528K
ide0: matterhorn_proxmox:iso/Ventura-full.iso,cache=unsafe,size=14G
ide2: local:iso/OpenCore-v17_2.iso,cache=unsafe,size=150M
machine: q35
memory: 24048
meta: creation-qemu=6.2.0,ctime=1662055311
name: Zermatt2
net0: virtio=D6:66:9F:D1:6E:60,bridge=vmbr1
numa: 0
onboot: 1
ostype: other
scsihw: virtio-scsi-single
smbios1: uuid=6af6f7ac-528f-4a49-9de2-302f7ad771bc
sockets: 1
virtio0: local:125/vm-125-disk-1.qcow2,cache=unsafe,discard=on,iothread=1,size=128G
vmgenid: 324d8a71-63ed-4731-8bac-26e2f7127b63
September Dev Beta boot SOLVED: I’ve managed to get a booting version of the most current developer beta of Ventura. I had to do some work on both the Kexts and config.plist. This isn’t a complete write-up but hopefully will help Nick and others find a way.
First, the latest version of Ventura absolutely requires the latest version of Lilu.kext
First you have to mount Nick’s OpenCore.iso:
mkdir /mnt/opencore
mount -o rw,loop,offset=20480 /foo/bar/path/to/OpenCore-v17.iso /mnt/opencore/
This will mount the OpenCore ISO using a loop device. If you run into issues, it may be the offset. Find the correct offset with fdisk -l /foo/bar/path/to/OpenCore-v17.iso and multiply the start sector by 512 to find the offset. It should be 20480 since we’re using Nick’s disk image.
Now that /mnt/opencore/ is mounted, go here and grab the latest lilu https://github.com/acidanthera/Lilu/releases
Put it in /mnt/opencore/EFI/OC/Kexts/
That _may_ solve it for most people. I’m using -cpu:host (i7-8770K) and so I have rebuilt my OC folder and config.plist accordingly. That said, there are some things in Nick’s config.plist which are not current….although they may be accurate for a Haswell CPU.
Hey Nick (Also)
Im running the same CPU (i7-8700k running as host) as you but im having issues with the latest update, could you share your EFI folder or at least your config.plist so i could take a look?
I have updated kexts etc, but it reboots after getting about 50% trough the boot, so im guessing there is an issue with my config.plist…
cheers
Hi Nick,
Great writeup as always, all I wanted to add is I came across an issue where after the download through system preferences finishes it proceeded to start installing it. I think I clicked next when I shoudn’t have but there is another option for downloading installer after profile is installed with softwareupdate in Terminal.
softwareupdate –fetch-full-installer –full-installer-version 13.0
This went through the process of downloading the installer and dumped it in Applications as the .app I wanted.
Hi Nick, how are you?
I’ve been using Proxmox since version 6, I’ve been using 7.0, 7.1 and now 7.2 to run macOS, and always with success.
It turns only in the Monterey version, there are always problems shutting down or restarting the system and this I noticed happens in all versions of Proxmox and also in several versions of Opencore, from 0.7.X until now to 0.8.4.
The problem is random, it doesn’t always happen, but it happens most of the time, and when it does, the CPU is at 100% of the VM referring to macOS.
Have you ever had this problem? Did you manage to solve it? I have Proxmox in 3 setups, 1 10th Intel, 1 12th Intel and 1 AMD Ryzen 5950X and they all have the same problem.
The problem happens not only when the Passthrough is performed, but also without configuring the passthrough as well.
In previous versions like High Sierra, Mojave, Catalina and Big Sur, the problem doesn’t happen, it’s only in Monterey.
When this problem happens, I just do a “qm reset IDVM” that solves it, but I would like to understand and try to solve this definitively.
Any idea?
I really admire your work! O/
Sorry, I have never encountered that issue in any version.
I have a Ryzen 3900x and had this same problem so I’m guessing it may be similar with the 5950x. I used the solution below (from the Monterey install guide). Monterey used to hang on shutdown, now works perfectly:
Packersowner says:
June 28, 2022 at 4:20 pm
Thanks for the guide. I am using a Ryzen 3900X and I have found that it does not like the cpu args: +pcid and +fma4 so I left them out.
Hi Nicholas,
Thanks for all your information about how to install Ventura on Proxmox 7.2
But I met an issue here. I followed up all the steps in your doc but I got an error message “Your computer restarted because of a problem” when I hit the Ventura installer.
I saw somebody changed to 1cpu1thread and got further but I was no lucky with this.
My proxmox host is MacPro, the CPU is “Intel(R) Xeon(R) W-3275M”, the image config is
———————–
agent: 1
balloon: 0
bios: ovmf
boot: order=ide2;virtio0;net0;ide0
cores: 1
cpu: Haswell
efidisk0: local-vmdata:vm-141-disk-0,size=4M
ide0: local:iso/Ventura-full.img,cache=unsafe,size=14G
ide2: local:iso/OpenCore-v17.iso,cache=unsafe,size=150M
machine: q35
memory: 4096
meta: creation-qemu=7.0.0,ctime=1664318452
name: MacOS-13.0-Beta
net0: virtio=CA:CE:22:F1:83:99,bridge=vmbr0,firewall=1
numa: 0
ostype: other
scsihw: virtio-scsi-single
smbios1: uuid=6a02b037-13b3-43e3-aed3-947c46589a98
sockets: 1
vga: vmware
virtio0: local-vmdata:vm-141-disk-1,cache=unsafe,discard=on,iothread=1,size=64G
vmgenid: 8c893dde-20ac-4e96-b979-35d22e7a65db
args: -device isa-applesmc,osk=”***” -smbios type=2 -device usb-kbd,bus=ehci.0,port=2 -global nec-usb-xhci.msi=off -global ICH9-LPC.acpi-pci-hotplug-with-bridge-support=off -cpu Haswell,vendor=GenuineIntel,+kvm_pv_eoi,+kvm_pv_unhalt,+hypervisor,+invtsc,kvm=on
——————————————-
Do you have any suggestion here? Thank you so much!
Has anyone had any success with the later developer betas? I tried beta 9 and it is giving me kernel panic on boot before mac os installation. From what I read so far beta 1 is the latest known working version but have not tried beta 2 through 5. 6 has been confirmed to show the same behavior as 8 or 9.
Newer betas require a new OpenCore version, and I haven’t updated mine yet sorry! Should have an update soon.
Thanks, Nick! Looking forward to your update. The script will also prob need a quick tweak to update the name of the install image. It’s default name is now “Install macOS Ventura beta” in place of “Install macOS 13 beta”
hey Nick
Love the post and I’m nearly there. I just can’t get the GPU passthrough working. I have it working on a Windows VM on the same Proxmox 7.2 server. I also have a hackintosh install that works on the same machine. I’m just trying to get the ventura vm working through proxmox.
The VM starts up no problem when the vid card is not attached. When attached my monitor shows nothing.
I’m using an RX580 like you are. Would you be able to shoot me over your config.plist and vm setup so I can compare?
Thanks!
Is it possible to get a guide on upgrading from Proxmox Monterey VM -> Ventura with changes required to make to OC etc? for some reason upon first reboot keeps crashing and rebooting upon entering MacOS Installer in bootpicker.
Yes, once the final version is available.
An update to OpenCore is required
I’ve now released OpenCore-v18 which adds support for the latest Ventura betas (I tested beta 9)
May I create a Japanese version of this article? Put a link to this article at the beginning of the article.
Yeah, sure
Thanks!